MongoDB For Beginners
March 29th, 2017

Introduction
MongoDB is a popular NoSQL database. It is usually the go to database for node apps since all the data stored in Mongo is formatted in JSON, it’s the perfect pairing to be able to use javascript in both the server and database. We’ll learn the basics of Mongo as well as how to use a GUI client.
Installation
First off, let’s download MongoDB and install it on our machine. If you’re using a Mac, homebrew would be the best option to install it. Next, follow the following instructions to make Mongo work on your corresponding operating system.
Starting Up Mongo
If you followed the instructions to a T, you should be able to start the Mongo daemon. Open a command line and type in:
1mongodYou can end the process with ctrl+c.
If you decided to install the MongoDB service, refer to the instructions for your OS again to see how to start Mongo.
Mongo Shell
Now, we’ll use the Mongo shell to create and manage our databases. Open up a new instance of your command line, make sure you still have the daemon running, then type the following to enter the shell.
1mongoCreating A Database
If all goes well, let’s create our first database! Don’t worry, the command is only two words, we’ll create a database for a made up startup called SynthraTech. In the same command line where you logged into the shell, enter:
1use SynthraTech;With the use command we can create and switch to a database. If ever you need to see which database you’re currently on just type db.
Creating A Collection
If you’re familiar with MySQL, think of collections as the equivalent of a table. The rows in the table are reffered to as documents in Mongo. Let’s create a collection for our users.
1db.createCollection('users');You should recieve an “ok” message, let’s double check by running show collections;.
Inserting A Document Into Collection
What’s a users collection without any users. Let’s add two.
1db.users.insert({ "first_name": "John", "last_name": "Doe" });db.users.insert({ "first_name": "Carlos", "middle_name": "Ray", "last_name": "Norris" });Notice how we have a middle name for the second user but not the first. This is one advantage of NoSQL, the ability to have whatever data you want in various documents, you don’t have to structure your collections in any way.
Every document created, receives a random id field. To view all the user document’s info, run:
1db.users.find();You can add .pretty() after the find method to recieve a better looking output.
Updating A Document
When updating data, you want to make sure you select it using a unique identifier. Let’s use the id that Mongo created for us, run db.users.find() and copy John Doe’s _id value. Let’s update the user John Doe and change his first name to Jack. Run the following command to change John’s name. Be sure to use the _id value that you copied earlier instead of the one shown below.
1db.users.update({ "_id": ObjectId("58da68d9bd9ad44b1a931db2") }, { $set: { "first_name": "Jack" } });Removing A Field
Let’s say we no longer want to include middle names as part of our user’s collection, let’s remove Carlos Norris’ middle name like so.
1db.users.update({ "_id" : ObjectId("58da68f7bd9ad44b1a931db3") }, { $unset: { "middle_name": 1 } });We can also omit the id selector and get the same affect.
1db.users.update({}, { $unset: { "middle_name": 1 } });This will select all the users, instead of just Carlos.
Deleting A Document
To delete a document, we can use the remove method. Just like update, we need to pass in a unique identifier. Let’s delete Carlos and use his _id.
1db.users.remove({ "_id" : ObjectId("58da68f7bd9ad44b1a931db3") });To remove all users, omit the selector.
1db.users.remove({});Managing Your Databases
To view a list of created Databases, you can run show dbs;. You should see SynthraTech as well as admin and local which were created upon the MongoDB installation.
Finally we’ll learn how to drop a database. Before dropping a database, make sure it’s currently in use. We can confirm this by running db. Once confirmed, we can drop SyntrhaTech with this command: db.dropDatabase();. Run show dbs; to confirm the drop.
Robomongo GUI
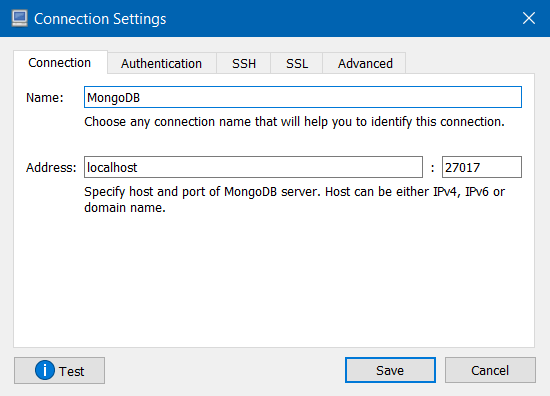
If you’re not into using a command line, Robomongo is a great GUI alternative. Once you have it installed you’ll need to set up a connection. Go to File > Connect > Create. It should look something like this:

You can name it whatever you would like, but make sure the address is at localhost and the port is 27017. Now save and connect, make sure the Mongo Daemon is running before connecting.
Conclusion
In this tutorial, we learned all the basics of Mongo, from create, read, update and delete. If you would like to learn more you can always visit Mongo’s official website.